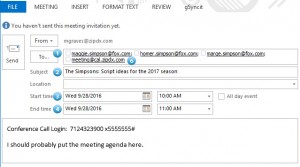
 Calendar scheduling programs like Outlook are an amazing time saver, and keep us on track in our modern lives. They also make the scheduling of conference calls super easy, providing an easy way to invite everyone via email, and feedback on who will be able to attend. Here’s how to schedule a free conference call using the Calendar features of Outlook (2010 and 2013, although should basically apply to all versions):
- Create New Meeting
- from your calendar, click New Meeting
- from your inbox, choose New Items > New Meeting
- In the To field, add attendees
- you can begin typing in their email address or contact name and it should auto-fill
- you can also add attendees in bulk by clicking Add Others > Add from Address Book
- In the Subject field, create a title for your conference call
- In the location box, you can optionally indicate this will be a conference call, or leave it blank
- Choose a Start Time and End Time for your call
- Note: If you want to schedule a conference call for a time zone other than the one you are in, click the Meeting tab, find the Options group, and click on Time Zones
- In the meeting request message field (best NOT to use the location field for this), enter your call in number and conference ID. Use an “x” to add an extension number (handy for conference login ID), or commas to add a pause for your additional conference login information.
- example for participants: 7124323900 x555555# for participants
example for moderator: 7124323900 x555555#,,,,,*,, 123456# for moderator
- example for participants: 7124323900 x555555# for participants
- Review your conference call. Note that the vertical lines indicate the timeframe. Green is the beginning of your call, red is the end. You can drag these lines to better match availability of participants.
- Note: If you are using Microsoft Exchange and/or Scheduling Assistant, you can take advantage of the features that allow you to see the availability of your attendees in order to schedule the best possible time for your call.
- If you don’t want the conference call to be recurring, you’re ready to go. Click Send
- If you do want this call to be a recurring event, this will take a little more setup. Just click the link before sending the event, and follow the instructions in the additional pop-up window.
That’s it!
Depending on how your invitees receive the message from your Outlook email account, they can click a button to confirm their participation, or drag the attached file to their calendar program and accept from there. Typically this will work across various popular calendar applications like iCal, Google Calendar, BusyCal, etc.
Tips: Outlook often tries to automatically add country codes to phone numbers, even when they aren’t needed. Smartphone users should avoid touching the Check Phone Number buttons as doing so will add a + and country code to the number. If you open the dialog, click Cancel to leave the screen, not Ok. Check Phone Number dialog
If you’re using Microsoft Lync 2010, you can take advantage of some other quick setup features. More here>>


